Okay, while it's perhaps not fit for royalty, we are very happy with our downstairs bathroom remodel. After much trial and tribulation, heartache and hairpulling, we have a working, attractive bathroom again. There are still several little details on the punch list to complete, but given how we roll, they may go unfinished for years!
Bathroom before:
I had tried to freshen the bath up a bit right after buying the house, but it was still an eyesore (that shower curtain is hiding an abundance of ugliness):
And now, for the big reveal!
From the mudroom entrance (the door you see straight ahead is off the guest bedroom, so this bath is like a Jack and Jill of sorts):
Vanity nook (mudroom doorway to the left, linen closet on the right):
Window wall:
Shower view:
Shampoo shelf (I'm OCD enough to want matching, pretty bottles, but frugal enough that these stay until used up!):
Here are the details:
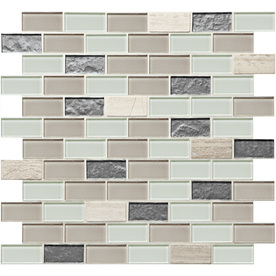
Shower tile: American Olean Monte Carlo 1x2 glass mosaic with Polyblend Oyster Bay non-sanded grout
Tub: Bootz Maui enameled steel extra deep soaking tub
Faucets: Price Pfister brushed nickel; shower is Marielle, vanity is Amherst
Toilet: Danze Orrington
Vanity: St. Paul Madeline 36" chestnut
Flooring: Style Selections 12x24 White Travertine with Blue Hawk Saddle Gray grout
I'm not convinced the shower curtain is the right one. I'm still
planning on sewing a custom creation, but this little TJMaxx find fills
the spot for the time being. I also am hunting for a better plant stand.
Sadly, we couldn't center the toilet under the window because of crazy old house plumbing, so the live plant deceives the eye as well as clears the air! But it deserves a nicer perch, when I can find the right one. You'll notice I also haven't shown any light fixtures. I'm really debating whether to go transitional/contemporary, blingy, or vintage basic with the overhead light and vanity sconce, so the old ones are still in place.
And if anyone knows where to purchase the skinniest trash can imaginable, please let me know. I have just a few inches to the left of the vanity and would love to squeeze in a slim waste receptacle. Otherwise, I'll probably look for a small door mounted version for inside the cabinet.
All in all, it's still only a bathroom. Just a simple tub/shower combo, toilet, and sink. The pictures are pretty, but the real dramatic difference is the function. We have new PEX pipes that won't freeze or corrode. Our water doesn't run red. Our hot water flows quickly and forcefully from the taps. Our toilet flushes the first time very time. Our tub isn't leaking into the wall. Our floor is level and clean. Our sink doesn't cause backaches to use. So if you'd like to come to inspect and appreciate the form and function in person, we're ready for houseguests anytime!
P.S. A big shout out to Christina from Little Victorian for the photo tips! It made a big difference in getting nice shots of all our hard work ;-)
Showing posts with label bathroom. Show all posts
Friday, January 24, 2014
Tuesday, January 21, 2014
Color Catastrophe
I just about had a heart attack while grouting the shower tile Sunday. I had spend hours selecting the perfect grout color, because it can make or break the tile. You can see how very different the sample mosaic looks with various grout colors.
In the end, I had to special order the non-sanded grout and matching caulk in the color I chose. Shipping took longer than expected and held up the rest of the bathroom, but I felt it was worth it. Until the moment Jeff brought me the freshly mixed grout and I began to apply it. Panic! It looked like baby poo! And that is not an exaggeration (or a phrase I use often; we usually prefer more elegant words like stool or feces or bowel movement, but in that moment, it was most definitely baby poo)!
I frequently see subtleties and nuances in color that Jeff doesn't, but even he agreed it looked pretty awful. This iPhone photo doesn't begin to capture the terrible color, and we were in no mood for pictures anyhow.
Now, I know from research that wet grout always looks much darker than dry. I know that people often initially dislike the grouted look after seeing tile bare for so long. I knew I had to let the grout dry and cure and then adjust to the new look before forming an honest opinion. And I held it together simply because I had no other choice. The grout had to go on that day; I didn't have time to pick out another color; I couldn't return the special order; and I couldn't very easily wipe all that fresh baby poo out of the joints even if I wanted to. But it was killing me that my hard fought tile job was being ruined by poopy grout! It made the blue-green tile look washed out, the taupe tile look purple, and the travertine look blah. I can't emphasize enough how terrible it was!
And then it dried. And then it cured. And then it was lovely. What a relief! Just another saga in the DIY adventures of Jeff and Sarah.
In the end, I had to special order the non-sanded grout and matching caulk in the color I chose. Shipping took longer than expected and held up the rest of the bathroom, but I felt it was worth it. Until the moment Jeff brought me the freshly mixed grout and I began to apply it. Panic! It looked like baby poo! And that is not an exaggeration (or a phrase I use often; we usually prefer more elegant words like stool or feces or bowel movement, but in that moment, it was most definitely baby poo)!
I frequently see subtleties and nuances in color that Jeff doesn't, but even he agreed it looked pretty awful. This iPhone photo doesn't begin to capture the terrible color, and we were in no mood for pictures anyhow.
Now, I know from research that wet grout always looks much darker than dry. I know that people often initially dislike the grouted look after seeing tile bare for so long. I knew I had to let the grout dry and cure and then adjust to the new look before forming an honest opinion. And I held it together simply because I had no other choice. The grout had to go on that day; I didn't have time to pick out another color; I couldn't return the special order; and I couldn't very easily wipe all that fresh baby poo out of the joints even if I wanted to. But it was killing me that my hard fought tile job was being ruined by poopy grout! It made the blue-green tile look washed out, the taupe tile look purple, and the travertine look blah. I can't emphasize enough how terrible it was!
And then it dried. And then it cured. And then it was lovely. What a relief! Just another saga in the DIY adventures of Jeff and Sarah.
Thursday, January 2, 2014
It's One Thing AND Another
They are wrong (whoever the ubiqitous "they" are). "They" say, if it's not one thing, it's another. I'm here to attest that it is both one thing AND the other. When it comes to tiling, anyhow!
Jeff and I are exhausted. We feel like we have been tiling for days. I forget now whose brilliant idea it was to do a tiled shower and install it all ourselves (okay, so maybe fatigue causes amnesia, because I'm pretty sure Jeff could tell you who dreamt up the plan). This was definitely a labor of love; it couldn't be anything like the labor of childbirth because I hear that pain fades and you're ready to do it all over again. I'm pretty sure my tiling days are over. In Scarlet O'Sarah style (as Jeff calls me when I get dramatic and plaintive):
I shall never lay tile again!
Well, except for the bathroom floor. Because I still have that to go. And then, of course, the mudroom needs matching tile, so I'll have to do that one day. But after that, no more tiling ever! I hope. So, maybe just no more tiny glass mosaic tile showers with lots of fiddly cuts, itty bitty pieces, tricky obstacles, and special expensive thinset.
This innocent, naive smile is the face of a woman who completed the long back wall of the shower in a day and is sure she can wrap up the two small walls in just another day.
See this niche? The one we spent hours laying out, measuring, and framing so the tiling would be easy? Well, I can't imagine how long it would have taken if we had just decided to wing it, because this niche (and flanking sides) took almost two hours to tile! You're probably starting to realize that we did not, in fact, complete the rest of the shower very quickly. I won't divulge our pathetically slow pace, but suffice it to say that between Jeff and my professional billing rates, we are well on our way to a multi-thousand dollar shower surround!
That's just a teaser photo, because I have yet to grout the tile. But I will say that the shower looks really great (if you don't stand too close!) and we're quite pleased with the last minute tile switcheroo.
Jeff and I are exhausted. We feel like we have been tiling for days. I forget now whose brilliant idea it was to do a tiled shower and install it all ourselves (okay, so maybe fatigue causes amnesia, because I'm pretty sure Jeff could tell you who dreamt up the plan). This was definitely a labor of love; it couldn't be anything like the labor of childbirth because I hear that pain fades and you're ready to do it all over again. I'm pretty sure my tiling days are over. In Scarlet O'Sarah style (as Jeff calls me when I get dramatic and plaintive):
I shall never lay tile again!
Well, except for the bathroom floor. Because I still have that to go. And then, of course, the mudroom needs matching tile, so I'll have to do that one day. But after that, no more tiling ever! I hope. So, maybe just no more tiny glass mosaic tile showers with lots of fiddly cuts, itty bitty pieces, tricky obstacles, and special expensive thinset.
This innocent, naive smile is the face of a woman who completed the long back wall of the shower in a day and is sure she can wrap up the two small walls in just another day.
See this niche? The one we spent hours laying out, measuring, and framing so the tiling would be easy? Well, I can't imagine how long it would have taken if we had just decided to wing it, because this niche (and flanking sides) took almost two hours to tile! You're probably starting to realize that we did not, in fact, complete the rest of the shower very quickly. I won't divulge our pathetically slow pace, but suffice it to say that between Jeff and my professional billing rates, we are well on our way to a multi-thousand dollar shower surround!
That's just a teaser photo, because I have yet to grout the tile. But I will say that the shower looks really great (if you don't stand too close!) and we're quite pleased with the last minute tile switcheroo.
Wednesday, December 25, 2013
Red-dy, Set, Tile!
I'm so excited! We're finally to the fun part. Building the tub surround has been a long, slow process due to out-of-square walls, wonky studs, lack of tools, and not enough time. Jeff has done a marvelous job framing for the cement backerboard and building the shampoo niche. It was my job to caulk, tape, and mud with thinset to even out all the awkward transition spots. Then, in a romantic little duet, we both climbed around each other in the tub to apply the vivid RED waterproof membrane as quickly, evenly, and neatly as possible.
And today, the moment has nearly arrived. The tub area will finally look like a place to shower or bathe, instead of a dusty wall or a glowing neon inferno. Tile time!
The process:
And today, the moment has nearly arrived. The tub area will finally look like a place to shower or bathe, instead of a dusty wall or a glowing neon inferno. Tile time!
The process:
| Protecting the tub and framing the wall |
| The much measured, plotted, and planned shampoo shelf |
| Mudding the joints with thinset |
| Feathering in the strange wall thickness |
| Jeff touching up the very red RedGard membrane (the Pepto-Bismol pink coating dries red, so you know it's cured) |
| Placing the very first tile. Only about 70 more sheets to go! |
Tuesday, December 24, 2013
Wet Feet
Not cold feet, as in backing out of something, but wet feet, as in changing horses mid stream!
After spending hours planning around the one inch mosaic tile I selected for the shower surround (and I mean hours!), we have scrapped that plan. Not because it wouldn't work eventually, but because inspiration struck while in the Lowes tile aisle!
To give you an idea of the magnitude of this change, I had better back up. To minimize tile cuts, we had measured and plotted every inch of the shower layout to perfection with the original tile I purchased in mind. We designed and built the shampoo niche to within an eighth of an inch specification so the tile patterns would fall just right. And then I had to go and fall in love with a different tile just one day before install!
I've mentioned some of the issues we had with the first tile. But we were moving forward pretty well and had everything on hand to start the job. I only ran to Lowes to pick up the flooring before the holidays. I will be forever grateful that the staff was stocking the tile department and had boxes and pallets all over the aisles. I grabbed what I needed, but had to detour down another aisle just to get out. And that's when I saw it! Lovely mosaic tile on clearance. Only $2.99 a square foot, in a 1x2 mini brick pattern, with mixed glass and travertine, picking up my bathroom colors AND the flooring tile I had just grabbed.
I stopped. I stared. I wavered, desperately sure that changing tile now would mess everything up. Why, we had just spent hours building the shower around a different size tile and mosaic sheet dimension! We couldn't change now, could we? Even though the new tile was cheaper? And prettier? And matched the flooring perfectly? What would Jeff say?!
I won't say it was a sign, but the store had exactly the right number of boxes I needed; no more, no less. And all in the same dye lot! I knew I could always bring the tile back, so I loaded those puppies up. All the way home, I wondered what Jeff would think. But I needn't have worried. When I got home and explained why I had 80 square feet of shower tile in the car when I went out for 50 square feet of flooring, he calmly listened to all the pros and cons, helped me carry in some samples of each tile to compare, and weighed in with his decision that...
He, too, liked the new option better!
So, the layout might not be perfect. There will be more cutting and fewer factory finished edges, since we didn't build with this tile in mind. But I will look at that shower and always know that sometimes, just sometimes, spontaneity and impulsiveness work together for an inspired design!
After spending hours planning around the one inch mosaic tile I selected for the shower surround (and I mean hours!), we have scrapped that plan. Not because it wouldn't work eventually, but because inspiration struck while in the Lowes tile aisle!
To give you an idea of the magnitude of this change, I had better back up. To minimize tile cuts, we had measured and plotted every inch of the shower layout to perfection with the original tile I purchased in mind. We designed and built the shampoo niche to within an eighth of an inch specification so the tile patterns would fall just right. And then I had to go and fall in love with a different tile just one day before install!
I've mentioned some of the issues we had with the first tile. But we were moving forward pretty well and had everything on hand to start the job. I only ran to Lowes to pick up the flooring before the holidays. I will be forever grateful that the staff was stocking the tile department and had boxes and pallets all over the aisles. I grabbed what I needed, but had to detour down another aisle just to get out. And that's when I saw it! Lovely mosaic tile on clearance. Only $2.99 a square foot, in a 1x2 mini brick pattern, with mixed glass and travertine, picking up my bathroom colors AND the flooring tile I had just grabbed.
I stopped. I stared. I wavered, desperately sure that changing tile now would mess everything up. Why, we had just spent hours building the shower around a different size tile and mosaic sheet dimension! We couldn't change now, could we? Even though the new tile was cheaper? And prettier? And matched the flooring perfectly? What would Jeff say?!
I won't say it was a sign, but the store had exactly the right number of boxes I needed; no more, no less. And all in the same dye lot! I knew I could always bring the tile back, so I loaded those puppies up. All the way home, I wondered what Jeff would think. But I needn't have worried. When I got home and explained why I had 80 square feet of shower tile in the car when I went out for 50 square feet of flooring, he calmly listened to all the pros and cons, helped me carry in some samples of each tile to compare, and weighed in with his decision that...
He, too, liked the new option better!
So, the layout might not be perfect. There will be more cutting and fewer factory finished edges, since we didn't build with this tile in mind. But I will look at that shower and always know that sometimes, just sometimes, spontaneity and impulsiveness work together for an inspired design!
| Our practice piece, after experimenting how to cut all those staggered edges! |
Thursday, December 12, 2013
DIE Lots
Yes, yes, I know. It should properly be spelled "dye" lots; as in, those batches of manufactured goods that are processed at the same time so they are the exact same color, shading, thickness, etc. But when you're really frustrated with poor quality control, it feels like it should be DIE lots!
Our bathroom remodel is coming along very slowly, but we aren't being helped by Chinese outsourcing. Namely, I discovered that all my boxes of glass mosaic tile must be from disparate dye lots. It became strikingly clear when I noticed one set of sheets was a good 1/8" smaller than another set. That doesn't sound like much, but over a one square foot sheet composed of one inch tiles and scant 1/8" grout lines, it means the joints won't line up!
As I frantically started comparing all 70 square feet of tile, I began to realize there are some pretty dramatic shade variations going on, too. Each sheet is composed of three colors; an icy seafoam, a medium blue-green, and a taupe. I now have five boxes with about six different permutations! The palest color may match between two boxes, but the taupe will be off. On others, the taupes look the same but the blue-green shade is very different. Overall, some of the boxes have a much bluer hue and some a greener. I've now spent hours on my hands and knees trying to figure out exactly how many tiles I need for each wall of the tub surround and finding enough similar ones for each surface. If the tiles weren't such a good deal, they would definitely be going back!
Our bathroom remodel is coming along very slowly, but we aren't being helped by Chinese outsourcing. Namely, I discovered that all my boxes of glass mosaic tile must be from disparate dye lots. It became strikingly clear when I noticed one set of sheets was a good 1/8" smaller than another set. That doesn't sound like much, but over a one square foot sheet composed of one inch tiles and scant 1/8" grout lines, it means the joints won't line up!
As I frantically started comparing all 70 square feet of tile, I began to realize there are some pretty dramatic shade variations going on, too. Each sheet is composed of three colors; an icy seafoam, a medium blue-green, and a taupe. I now have five boxes with about six different permutations! The palest color may match between two boxes, but the taupe will be off. On others, the taupes look the same but the blue-green shade is very different. Overall, some of the boxes have a much bluer hue and some a greener. I've now spent hours on my hands and knees trying to figure out exactly how many tiles I need for each wall of the tub surround and finding enough similar ones for each surface. If the tiles weren't such a good deal, they would definitely be going back!
| The camera doesn't capture the variations well, but you can probably see the far right box doesn't look much like the middle and left boxes! |
Monday, November 11, 2013
Blank Slate
After all our bathroom remodeling woes over the past few days, we are thankfully down to a blank slate. We got the self-leveling concrete underlayment poured this weekend to take out the worst of the floor dip (more than inch drop from the edge of the floor to the middle, and that's only a distance of about three feet)! The patch looks a bit awkward right now, but it will all be covered by new flooring, so appearance hardly matters. We'll just be glad not to get dizzy and off balance on the walk to the commode anymore!

While picking up the deep soaker tub at Home Depot Sunday, I started chatting with a very friendly lady who was contemplating a bathroom remodel herself. After discussing the merits of different tubs and surrounds, she insisted on checking us out with her military ID so she could gift us with her service member discount. Since I used credit card points for a store gift card, our tub worked out to be free. I even have a few dollars left on the card! It's nice to save a little money here and there, since budget creep always happens during these projects.
Thursday, November 7, 2013
Living Dangerously
What does one do with sharp, prickly, potentially dangerous small objects that have outlived their usefulness? Why, drop them into the nearest available wall cavity, of course!
This is what I found after removing the old recessed medicine cabinet in the downstairs bathroom. A large pile of rusty old razor blades, bent sewing pins, and broken needles!
I think I was aware of the little slot in the back of a medicine cabinet being used for that purpose many years ago, but I guess I wasn't prepared to find decades worth of old sharps in my bathroom wall!
But that was only the first brush with danger. As Jeff was tearing out the tub surround later the same evening, he happened upon an electrical outlet in the wall. A live outlet with plugs in it buried right behind the flimsy fiberglass surround, just under all the plumbing. You don't have to be an experienced remodeler to know that water and electricity DO NOT mix! We still have no idea what it goes to, or which breaker it's on, so we have been gingerly working around it for the time being.
So, you would think that would be our excitement for the week. But no. When you start messing with an old house, that's when problems pop up. In order for us to tear out the old wall-mounted sink (on which the shut off valve had broken), the plumbers came out and capped off the old galvanized pipes in the basement that run to the bathroom. All was well for about 24 hours, until I noticed a strange noise suddenly. It turns out that the cap on the cold water line split and water was pouring out in the basement. This was just as we were sitting down to dinner, so Jeff had to get in the car and drive down to the corner where our water main is located (on the cross street about 500-600 feet as the crow flies, but he wasn't about to walk the bumpy pasture in the dark) and shut off our water. The plumber can't make it until the morning, so I filled a few jugs and pails in the time it took Jeff to get the water off. Sponge bath it is tonight, then!
| Innocent hole in the wall, right? |
This is what I found after removing the old recessed medicine cabinet in the downstairs bathroom. A large pile of rusty old razor blades, bent sewing pins, and broken needles!
| There were probably more that went down between the bricks! |
I think I was aware of the little slot in the back of a medicine cabinet being used for that purpose many years ago, but I guess I wasn't prepared to find decades worth of old sharps in my bathroom wall!
But that was only the first brush with danger. As Jeff was tearing out the tub surround later the same evening, he happened upon an electrical outlet in the wall. A live outlet with plugs in it buried right behind the flimsy fiberglass surround, just under all the plumbing. You don't have to be an experienced remodeler to know that water and electricity DO NOT mix! We still have no idea what it goes to, or which breaker it's on, so we have been gingerly working around it for the time being.
| See that orange outline around the electrical box? This is exactly where Jeff found the outlet, just inches from the tub spout and all that insulation! |
So, you would think that would be our excitement for the week. But no. When you start messing with an old house, that's when problems pop up. In order for us to tear out the old wall-mounted sink (on which the shut off valve had broken), the plumbers came out and capped off the old galvanized pipes in the basement that run to the bathroom. All was well for about 24 hours, until I noticed a strange noise suddenly. It turns out that the cap on the cold water line split and water was pouring out in the basement. This was just as we were sitting down to dinner, so Jeff had to get in the car and drive down to the corner where our water main is located (on the cross street about 500-600 feet as the crow flies, but he wasn't about to walk the bumpy pasture in the dark) and shut off our water. The plumber can't make it until the morning, so I filled a few jugs and pails in the time it took Jeff to get the water off. Sponge bath it is tonight, then!
| The blue arrow is pointing to the broken cap on the end of a very rusty galvanized pipe. You don't need an arrow to point out the growing pool of water underneath! |
Monday, October 28, 2013
Weekend Work
I know it's been months since I mentioned the downstairs bathroom renovation (you remember, this post?). I haven't posted more about it because...nothing's happened! Well, I've been getting quotes, making measurements, gathering more materials, etc. But only in the last few days have we committed ourselves.
That commitment came in the form of destruction. Once you start tearing something out, you really have to keep moving forward! We wanted to do this in the most tidy and methodical way, so it's slow going. We're using a Dremel tool with small drywall bit to cut out the shower surround and tub. Thankfully, it's a two piece model, so it shouldn't cause too much damage to the existing walls to get it out. Our plumber is tied up with a few other jobs before ours, so that buys us some time. We decided to go all in and have the toilet moved over (which involves breaking up the concrete) and vanity re-plumbed also, not just the shower. So the work involved is a little more extensive (and expensive ;-), but it should be worth it!
| Bit by bit! We went through five or six bits just to cut all the way around the tub and surround |
Monday, July 22, 2013
Small and suite
It's time to get the ball rolling on the downstairs bathroom renovation! After scrubbing it down, disinfecting everything, and giving walls, ceilings, and floor (yes, even the linoleum) a coat of paint back when we moved in, nothing much has happened for the little full bath. The fiberglass tub is badly stained, the galvanized plumbing runs rusty water at times, the toilet occasionally misfires, the ancient wall-mounted sink is tiny and low, and the torn linoleum is curling and peeling. (Is it any wonder we added on the new bathroom upstairs?!) But this little first floor bath has a good layout, great storage, a cute little window, and convenient access as the downstairs bedroom en suite, as well as serving the kitchen and mudroom.
Here's the plan so far:
This will be my first tile laying experience. I've grouted before, and patched a tile here and there, but I plan to take this from start to finish. To that end, I chose a small mesh-mounted glass mosaic for the shower surround. I originally wanted marble, but have you hefted a 12 inch marble tile lately? It's really, really heavy! And it's apparently hard to cut. I had visions of hard, fragile marble tile dropping off the messy mastic walls onto my foot; or worse, damaging the new tub! We already have subway tile upstairs, and I wanted something a little different for this bath, so glass mosaic it is.
The tile, lighting, faucets, and vanity are already purchased. The tub, toilet, and flooring are picked out. All I have to do is get the plumber in to run new water lines. Oh, and of course, wait for our upcoming guests to arrive and depart before I begin tearing the bathroom to pieces!
Saturday, February 23, 2013
God is in the Details
I've had several questions about the bathroom, so I thought I should cover some of the nitty-gritty and then move on, away from potty-talk finally.
We did contract out the bulk of the work, since it needed to be done to code and pass a building inspection; but we designed the addition and layout, sourced and selected all the materials, supervised (and intervened) on a daily basis, laid the floor, and painted and wallpapered.
Here are some "mug shots":


Here are the materials we used:
We did contract out the bulk of the work, since it needed to be done to code and pass a building inspection; but we designed the addition and layout, sourced and selected all the materials, supervised (and intervened) on a daily basis, laid the floor, and painted and wallpapered.
Here are some "mug shots":
Here are the materials we used:
Vanities: St. Paul 36" espresso (special buy at Home Depot)
Tile: Merola cobalt and white
basketweave for shower floor and niche; Lowes stock subway tile for
field; Lowes clearance white chair rail and pencil liner for accents;
Mapei Silver grout; Home Depot marble thresholds for niche shelving and shower curb
Faucets: Delta Victorian chrome shower
and vanity faucets; Price Pfister Savannah floor mount tub faucet and
risers
Tub: antique 1920's Kohler from local
flea market, painted Ben Moore Hale Navy
Toilet: Danze Orrington
Lighting: clearance exterior lanterns
from Lowes
Flooring: Novalis vinyl planks in
Gunstock
My one regret not having more closed
storage, but it wasn't an oversight. To preserve the symmetry of the
house, we matched the gable addition to the existing front gable.
That gave us a rather square room with lots of floor space in the
middle and large triple windows. We couldn't bump a closet into the
knee wall space on either side of the gable, and I couldn't figure
out how to build one in and keep an attractive and functional
arrangement of fixtures. The new toilet ended up 15” from the wall
because of a floor joist, so I had that section of the wall furred
out and a built-in niche framed. I plan to have doors made
eventually, so that will hide the less attractive bathroom
necessities. And the less places to hide the mess, the more tidy and organized we will have to be, which isn't a bad thing!
Thursday, February 14, 2013
Bathroom Bonanza!
We're done! No more plumbers, no more tiler, no more handyman trim guy helper dude, no more contractor. They are all paid and gone home, leaving us to enjoy our bright, new, luxurious bathroom on the second floor.
We're looking forward to light-filled morning routines and long evening soaking rituals. No more squishing between the tub and toilet. No more ducking the medicine cabinet when someone needs toothpaste. No more foggy mirrors. No more slanted floor. No more balancing act to get the blow dryer and curling iron on the pedestal sink simultaneously. That bathroom still exists downstairs, of course; we just don't have to be subjected to it multiple times per day.
Granted, when I say done, I mean as finished as any project in the Evans' household ever is these days. We still plan to do the wainscoting (which was to be completed over winter break, back when we naively thought a six week project by professionals wouldn't take four months), maybe some crown moulding (if we can figure out how to handle the awkward little space above the windows), the matching lantern over the tub, a second coat of paint and some shelves in the niche, a doorknob, and accessories. But it's usable, and that's done enough in my book! So, here are some additional photos:
And, because Jeff insists a bathroom needs privacy for some reason, here's a night shot with the cafe curtains I hung. When I can stomach the expense, I'd like to install top-down, bottom-up cellular shades, but these are cute and cheap for the time being.
We're so excited and relieved to be at this point. There were days I thought it would never end, and nights I feared my vision had run amok. But the pangs are over and I would do it all again! Oh, that's right, I still have two more bathrooms to go. And three bedrooms, and a staircase, and Jeff's study, and ...I'll definitely be needing a relaxing bubble bath in that clawfoot tub!
Friday, February 1, 2013
Mock Up Madness
Now that the pretty wallpaper is up, I don't want to mar it with extraneous holes. So I'm mocking up the vanity mirror placement and orientation with rosin paper. If only I could decide if horizontal or vertical is better. Which do you prefer?
The overview (please ignore the missing drawers):
The vertical closeup:
The horizontal closeup:
The overview (please ignore the missing drawers):
The vertical closeup:
The horizontal closeup:
Friday, January 25, 2013
Papering
With my new level line scribed, I'm on to wallpapering. A less popular choice these days, it feels authentic for a 1920's house. I probably went overboard (ha, ha; pun will be evident when you see the wallpaper pattern) with the vintage, as the design was inspired by a cotton toile circa 1848. But I enjoy toile and Jeff really liked this particular pattern. There is a long history of sailing in the family that built our farmhouse, so it was a nice homage.
Pattern close-up:
Window wall:
Door and shower wall:
Pattern close-up:
Window wall:
Door and shower wall:
Subscribe to:
Posts (Atom)