Okay, while it's perhaps not fit for royalty, we are very happy with our downstairs bathroom remodel. After much trial and tribulation, heartache and hairpulling, we have a working, attractive bathroom again. There are still several little details on the punch list to complete, but given how we roll, they may go unfinished for years!
Bathroom before:
I had tried to freshen the bath up a bit right after buying the house, but it was still an eyesore (that shower curtain is hiding an abundance of ugliness):
And now, for the big reveal!
From the mudroom entrance (the door you see straight ahead is off the guest bedroom, so this bath is like a Jack and Jill of sorts):
Vanity nook (mudroom doorway to the left, linen closet on the right):
Window wall:
Shower view:
Shampoo shelf (I'm OCD enough to want matching, pretty bottles, but frugal enough that these stay until used up!):
Here are the details:
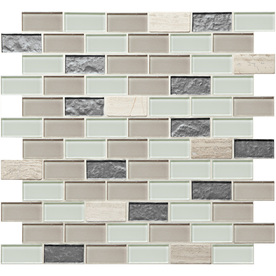
Shower tile: American Olean Monte Carlo 1x2 glass mosaic with Polyblend Oyster Bay non-sanded grout
Tub: Bootz Maui enameled steel extra deep soaking tub
Faucets: Price Pfister brushed nickel; shower is Marielle, vanity is Amherst
Toilet: Danze Orrington
Vanity: St. Paul Madeline 36" chestnut
Flooring: Style Selections 12x24 White Travertine with Blue Hawk Saddle Gray grout
I'm not convinced the shower curtain is the right one. I'm still
planning on sewing a custom creation, but this little TJMaxx find fills
the spot for the time being. I also am hunting for a better plant stand.
Sadly, we couldn't center the toilet under the window because of crazy old house plumbing, so the live plant deceives the eye as well as clears the air! But it deserves a nicer perch, when I can find the right one. You'll notice I also haven't shown any light fixtures. I'm really debating whether to go transitional/contemporary, blingy, or vintage basic with the overhead light and vanity sconce, so the old ones are still in place.
And if anyone knows where to purchase the skinniest trash can imaginable, please let me know. I have just a few inches to the left of the vanity and would love to squeeze in a slim waste receptacle. Otherwise, I'll probably look for a small door mounted version for inside the cabinet.
All in all, it's still only a bathroom. Just a simple tub/shower combo, toilet, and sink. The pictures are pretty, but the real dramatic difference is the function. We have new PEX pipes that won't freeze or corrode. Our water doesn't run red. Our hot water flows quickly and forcefully from the taps. Our toilet flushes the first time very time. Our tub isn't leaking into the wall. Our floor is level and clean. Our sink doesn't cause backaches to use. So if you'd like to come to inspect and appreciate the form and function in person, we're ready for houseguests anytime!
P.S. A big shout out to Christina from Little Victorian for the photo tips! It made a big difference in getting nice shots of all our hard work ;-)
Showing posts with label decorating. Show all posts
Friday, January 24, 2014
Monday, December 30, 2013
99¢ Mantel
No pretty bathroom progress pics yet, but the adjoining guest room is looking a little nicer, due to a tiny step forward in reclaiming the fireplace in there. The credit goes to the shabby mantel that's not so shabby anymore. It wasn't a bad purchase for $.99, especially since I bought it over two years ago and didn't even know if I would get to use it. But after all the restoration work it has required the past few weeks, I'm glad I didn't pay much more!
I don't know if it was purposely "shabby chic" or just really neglected, but I'm leaning more toward the latter. After scraping, heat gunning (if that's not a word, it should be), cutting, repairing, sanding, caulking, priming, and painting, the mantel is fit for the guest bedroom!
Before:
Stripped bare:
Priming:
Painting:
Before:
Stripped bare:
Priming:
Painting:
Sadly, the guest bedroom firebox is not quite ready for such a lovely surround. It will probably be months before we tear open this brick wall, especially after our lengthy experience with the other firebox (which you can read about here and here)! But the mantel is now sleek instead of shabby and, more importantly, out of our shop and closer to realizing its potential. Even if we never get a real fireplace installed, I will have gotten to enjoy the effect of a design idea concocted before we even purchased the house!
Propped:
Propped:
Tuesday, December 24, 2013
Wet Feet
Not cold feet, as in backing out of something, but wet feet, as in changing horses mid stream!
After spending hours planning around the one inch mosaic tile I selected for the shower surround (and I mean hours!), we have scrapped that plan. Not because it wouldn't work eventually, but because inspiration struck while in the Lowes tile aisle!
To give you an idea of the magnitude of this change, I had better back up. To minimize tile cuts, we had measured and plotted every inch of the shower layout to perfection with the original tile I purchased in mind. We designed and built the shampoo niche to within an eighth of an inch specification so the tile patterns would fall just right. And then I had to go and fall in love with a different tile just one day before install!
I've mentioned some of the issues we had with the first tile. But we were moving forward pretty well and had everything on hand to start the job. I only ran to Lowes to pick up the flooring before the holidays. I will be forever grateful that the staff was stocking the tile department and had boxes and pallets all over the aisles. I grabbed what I needed, but had to detour down another aisle just to get out. And that's when I saw it! Lovely mosaic tile on clearance. Only $2.99 a square foot, in a 1x2 mini brick pattern, with mixed glass and travertine, picking up my bathroom colors AND the flooring tile I had just grabbed.
I stopped. I stared. I wavered, desperately sure that changing tile now would mess everything up. Why, we had just spent hours building the shower around a different size tile and mosaic sheet dimension! We couldn't change now, could we? Even though the new tile was cheaper? And prettier? And matched the flooring perfectly? What would Jeff say?!
I won't say it was a sign, but the store had exactly the right number of boxes I needed; no more, no less. And all in the same dye lot! I knew I could always bring the tile back, so I loaded those puppies up. All the way home, I wondered what Jeff would think. But I needn't have worried. When I got home and explained why I had 80 square feet of shower tile in the car when I went out for 50 square feet of flooring, he calmly listened to all the pros and cons, helped me carry in some samples of each tile to compare, and weighed in with his decision that...
He, too, liked the new option better!
So, the layout might not be perfect. There will be more cutting and fewer factory finished edges, since we didn't build with this tile in mind. But I will look at that shower and always know that sometimes, just sometimes, spontaneity and impulsiveness work together for an inspired design!
After spending hours planning around the one inch mosaic tile I selected for the shower surround (and I mean hours!), we have scrapped that plan. Not because it wouldn't work eventually, but because inspiration struck while in the Lowes tile aisle!
To give you an idea of the magnitude of this change, I had better back up. To minimize tile cuts, we had measured and plotted every inch of the shower layout to perfection with the original tile I purchased in mind. We designed and built the shampoo niche to within an eighth of an inch specification so the tile patterns would fall just right. And then I had to go and fall in love with a different tile just one day before install!
I've mentioned some of the issues we had with the first tile. But we were moving forward pretty well and had everything on hand to start the job. I only ran to Lowes to pick up the flooring before the holidays. I will be forever grateful that the staff was stocking the tile department and had boxes and pallets all over the aisles. I grabbed what I needed, but had to detour down another aisle just to get out. And that's when I saw it! Lovely mosaic tile on clearance. Only $2.99 a square foot, in a 1x2 mini brick pattern, with mixed glass and travertine, picking up my bathroom colors AND the flooring tile I had just grabbed.
I stopped. I stared. I wavered, desperately sure that changing tile now would mess everything up. Why, we had just spent hours building the shower around a different size tile and mosaic sheet dimension! We couldn't change now, could we? Even though the new tile was cheaper? And prettier? And matched the flooring perfectly? What would Jeff say?!
I won't say it was a sign, but the store had exactly the right number of boxes I needed; no more, no less. And all in the same dye lot! I knew I could always bring the tile back, so I loaded those puppies up. All the way home, I wondered what Jeff would think. But I needn't have worried. When I got home and explained why I had 80 square feet of shower tile in the car when I went out for 50 square feet of flooring, he calmly listened to all the pros and cons, helped me carry in some samples of each tile to compare, and weighed in with his decision that...
He, too, liked the new option better!
So, the layout might not be perfect. There will be more cutting and fewer factory finished edges, since we didn't build with this tile in mind. But I will look at that shower and always know that sometimes, just sometimes, spontaneity and impulsiveness work together for an inspired design!
![]() |
| Our practice piece, after experimenting how to cut all those staggered edges! |
Sunday, December 22, 2013
Craft Room Follow-Up
My gawky craft roof is finally coming along. It's been slow going, since the bathroom really needs to take priority, but I have been able to get a few things done here and there. I still need to do something with the window sashes and muntins; I'm thinking of trying a dark ebony stain first. If I don't like that, then I can just paint it all white like the trim. The floor still needs to be sanded and finished, and I'd like to install baseboards while I'm at it. I'm also planning a box cushion for the windowseat. But the new wall and ceiling color (BM Revere Pewter) and painted trim (BM Linen White) have really brightened up the room. It definitely reflects a lot more light; even into the upstairs hallway, which I wasn't expecting!
Before we moved in:
Interim:
Now:
The wall color looks a little washed out in these photos, but it's a warm gray or light taupe. You can see the difference compared to the creamy white door and window trim.
The room is pretty sparse right now, but for a sewing and craft center, I think I like starting that way. It will fill up fast! I have a folding table I can set up for cutting or pattern layout, and I may build a fold out top for the bureau to serve as an extended work surface, too.
I mentioned the retro shortie curtains in a post a few days ago about window treatments. I was thrilled that they worked so well with my rug! This dhurrie rug started out in the kitchen, then moved to our temporary bedroom, and now finds a long-term home in the craft room. I love when a piece is that flexible! It assures me that my design choices are cohesive enough for the house as a whole, instead of just individual rooms.
I really wish I could use a vintage pendant or some other unique lighting fixture in the room, but the upstairs ceilings are barely seven feet high. So I had to go with a flush mount that would light the corners of the room and not just glare down from the center. I'm satisfied with this halogen unit, and it was cheap enough to be a placeholder unless/until I can find something I really love. I installed it in probably less than half an hour (no nightmare lighting adventure like the guest room chandelier experience!), but at least fifteen minutes of that was trying to insert the small, fiddly halogen lights into the narrow shades using the special "relamping" tool, since you can't touch any part of the bulbs!
Another little update was my sewing machine table. It's just a small desk I bought years ago. But I didn't know what I was doing at the time and painted it rather poorly with a cheap brush and low quality paint. This time, I sanded it down to smooth the bristle marks and gave it two coats of good paint with my favorite Purdy sash brush. What a difference!
Before repainting:
After:
I was thrilled to find this vintage metal and wood ironing board at one of my local thrift stores last month. It was only $5, and I find it functional as well as lovely. Double score on the William Morris test!
"Have nothing in your houses that you do not know to be useful, or believe to be beautiful." - William Morris (father of the Arts and Crafts movement)
It's a happy, streamlined little space now, so maybe after the bathroom remodel is done, I'll be able to get into the craft room and do some sewing!
Before we moved in:
Interim:
Now:
The wall color looks a little washed out in these photos, but it's a warm gray or light taupe. You can see the difference compared to the creamy white door and window trim.
The room is pretty sparse right now, but for a sewing and craft center, I think I like starting that way. It will fill up fast! I have a folding table I can set up for cutting or pattern layout, and I may build a fold out top for the bureau to serve as an extended work surface, too.
I mentioned the retro shortie curtains in a post a few days ago about window treatments. I was thrilled that they worked so well with my rug! This dhurrie rug started out in the kitchen, then moved to our temporary bedroom, and now finds a long-term home in the craft room. I love when a piece is that flexible! It assures me that my design choices are cohesive enough for the house as a whole, instead of just individual rooms.
I really wish I could use a vintage pendant or some other unique lighting fixture in the room, but the upstairs ceilings are barely seven feet high. So I had to go with a flush mount that would light the corners of the room and not just glare down from the center. I'm satisfied with this halogen unit, and it was cheap enough to be a placeholder unless/until I can find something I really love. I installed it in probably less than half an hour (no nightmare lighting adventure like the guest room chandelier experience!), but at least fifteen minutes of that was trying to insert the small, fiddly halogen lights into the narrow shades using the special "relamping" tool, since you can't touch any part of the bulbs!
Another little update was my sewing machine table. It's just a small desk I bought years ago. But I didn't know what I was doing at the time and painted it rather poorly with a cheap brush and low quality paint. This time, I sanded it down to smooth the bristle marks and gave it two coats of good paint with my favorite Purdy sash brush. What a difference!
Before repainting:
After:
I was thrilled to find this vintage metal and wood ironing board at one of my local thrift stores last month. It was only $5, and I find it functional as well as lovely. Double score on the William Morris test!
"Have nothing in your houses that you do not know to be useful, or believe to be beautiful." - William Morris (father of the Arts and Crafts movement)
It's a happy, streamlined little space now, so maybe after the bathroom remodel is done, I'll be able to get into the craft room and do some sewing!
Tuesday, December 17, 2013
Blind No More
Finally, after more than two years in our old farmhouse, the last of the aluminum blinds are down from the windows!
The whole house had the exact same old blinds throughout, so I could at least appreciate the symmetry and continuity of the effort. But the blinds were dingy, dusty, often bent, and noisy when operated; and they did very little to accentuate the beautiful wood windows. Due to drafts and light control needs, I couldn't leave the lovely windows bare, but I did want to highlight as much of the molding and wavy glass as possible.
I've tired of seeing the same fabrics and styles of window treatments everywhere, so I went a little vintage in a few rooms. The quality of materials and workmanship in older items often can't be surpassed these days, and what's old is new again in the design world. So why not step back from the mass marketed products of today, score a deal, and keep things out of the landfill by reusing some quality items of yesteryear? In particular, I used 1950's barkcloth panels in the downstairs guest room and retro fiberglass shorty curtains in the gable sewing room (both sourced on eBay).
Here's a sample of the window treatments throughout the house.
Dining room before:
After:
Living room before:
After:
Guest room before:
After:
Study before:
After:
Gable room before:
After:
In the rooms with white trim, I still need to paint all the interior window sashes and muntins, but first I must repair a few of the sash cords. That involves prying off the stops to get to the weights in the pocket, so you can see why I have an excuse to wait before caulking and painting!
The whole house had the exact same old blinds throughout, so I could at least appreciate the symmetry and continuity of the effort. But the blinds were dingy, dusty, often bent, and noisy when operated; and they did very little to accentuate the beautiful wood windows. Due to drafts and light control needs, I couldn't leave the lovely windows bare, but I did want to highlight as much of the molding and wavy glass as possible.
I've tired of seeing the same fabrics and styles of window treatments everywhere, so I went a little vintage in a few rooms. The quality of materials and workmanship in older items often can't be surpassed these days, and what's old is new again in the design world. So why not step back from the mass marketed products of today, score a deal, and keep things out of the landfill by reusing some quality items of yesteryear? In particular, I used 1950's barkcloth panels in the downstairs guest room and retro fiberglass shorty curtains in the gable sewing room (both sourced on eBay).
Here's a sample of the window treatments throughout the house.
Dining room before:
After:
Living room before:
After:
Guest room before:
After:
Study before:
After:
Gable room before:
After:
In the rooms with white trim, I still need to paint all the interior window sashes and muntins, but first I must repair a few of the sash cords. That involves prying off the stops to get to the weights in the pocket, so you can see why I have an excuse to wait before caulking and painting!
Saturday, February 23, 2013
God is in the Details
I've had several questions about the bathroom, so I thought I should cover some of the nitty-gritty and then move on, away from potty-talk finally.
We did contract out the bulk of the work, since it needed to be done to code and pass a building inspection; but we designed the addition and layout, sourced and selected all the materials, supervised (and intervened) on a daily basis, laid the floor, and painted and wallpapered.
Here are some "mug shots":


Here are the materials we used:
We did contract out the bulk of the work, since it needed to be done to code and pass a building inspection; but we designed the addition and layout, sourced and selected all the materials, supervised (and intervened) on a daily basis, laid the floor, and painted and wallpapered.
Here are some "mug shots":


Here are the materials we used:
Vanities: St. Paul 36" espresso (special buy at Home Depot)
Tile: Merola cobalt and white
basketweave for shower floor and niche; Lowes stock subway tile for
field; Lowes clearance white chair rail and pencil liner for accents;
Mapei Silver grout; Home Depot marble thresholds for niche shelving and shower curb
Faucets: Delta Victorian chrome shower
and vanity faucets; Price Pfister Savannah floor mount tub faucet and
risers
Tub: antique 1920's Kohler from local
flea market, painted Ben Moore Hale Navy
Toilet: Danze Orrington
Lighting: clearance exterior lanterns
from Lowes
Flooring: Novalis vinyl planks in
Gunstock
My one regret not having more closed
storage, but it wasn't an oversight. To preserve the symmetry of the
house, we matched the gable addition to the existing front gable.
That gave us a rather square room with lots of floor space in the
middle and large triple windows. We couldn't bump a closet into the
knee wall space on either side of the gable, and I couldn't figure
out how to build one in and keep an attractive and functional
arrangement of fixtures. The new toilet ended up 15” from the wall
because of a floor joist, so I had that section of the wall furred
out and a built-in niche framed. I plan to have doors made
eventually, so that will hide the less attractive bathroom
necessities. And the less places to hide the mess, the more tidy and organized we will have to be, which isn't a bad thing!
Friday, February 1, 2013
Mock Up Madness
Now that the pretty wallpaper is up, I don't want to mar it with extraneous holes. So I'm mocking up the vanity mirror placement and orientation with rosin paper. If only I could decide if horizontal or vertical is better. Which do you prefer?
The overview (please ignore the missing drawers):
The vertical closeup:
The horizontal closeup:
The overview (please ignore the missing drawers):
The vertical closeup:
The horizontal closeup:
Thursday, December 6, 2012
Hiding in Plain Sight
I finally got around to a niggling little project several months late. Our central heat and air system was installed in the spring, and our air return is in the dining room wall. It's usually a bit obscured from the general line of sight by the piano, but since the floor finish is still curing, we haven't moved the beast back in yet. So I started noticing the large white grate and felt it was time to do something about the eyesore. I would love to upgrade to one of those decorative iron grilles like this:
But I'm not sure drawing attention to mine is the way to go, and they are also very expensive. So I whipped out my leftover wall paint and a small brush and gave the original grate a few coats (after a thorough cleaning, that is). Now it practically disappears (until the furnace kicks on and there is a whooshing sound in that general vicinity; kind of gives away my secret)!
Before:
After:
But I'm not sure drawing attention to mine is the way to go, and they are also very expensive. So I whipped out my leftover wall paint and a small brush and gave the original grate a few coats (after a thorough cleaning, that is). Now it practically disappears (until the furnace kicks on and there is a whooshing sound in that general vicinity; kind of gives away my secret)!
Before:
After:
Subscribe to:
Posts (Atom)